
How to Build a Crypto Gain and Loss on Investment Calculator with HTML, CSS (SCSS) and JavaScript.
HTML, CSS and JavaScript project


Welcome to this tutorial, in this tutorial, you will build a real-world project that beautifies your portfolio.
This tutorial is intentionally designed to give you real-world challenges and influences you to learn and apply all you have been learning from HTML, CSS (SCSS) and JavaScript. To benefit, a lot from this tutorial, try to make it better. And if you're a total beginner, you can check out How to create a two-column layout with HTML & CSS (YouTube Clone - part 1) instead.
Let's begin!
As cryptocurrency is very volatile, the returns on investment in crypto currenciess tend to go up and down from time to time. It might be very stressful to keep calculating your loss and gains (If you need to) all the time things change, so we’re going to build a simple application that can help us calculate returns on investment.
It will take a currency, quantity purchased and the current price of the currency. Then it will calculate loss and gain on investment. Below is what the application we are going to build looks like and you can click to download the source code for the application or you can check its demo here. Now, Let’s get started.
Application structure with HTML
The first thing we have to do is create the skeletal structure of the application with HTML as in the code below:
File: index.html
<!DOCTYPE html>
<html>
<head>
    <title>Crypto gain and loss leaderboard</title>
    <meta name="viewport" content="width=device-width, initial-scale=1.0" />
    <link rel="stylesheet" href="style.css">
</head>
<body>
    <div class="container">

    </div>
</body>
</html>
Now, we will add the header section of the application to the html code above and it will now look like the following:
<!DOCTYPE html>
<html>
<head>
    <title>Crypto gain and loss board</title>
    <meta name="viewport" content="width=device-width, initial-scale=1.0" />
    <link rel="stylesheet" href="style.css">
</head>
<body>

<div class="container">
    <header class="header">
        <img src="" class="logo">
        <div class="input-box">
            <select name="" class="select" id="select-crypto">

            </select>
            <input type="text" placeholder="quantity" value="" class="quantity">
            <input type="text" placeholder="Cost per crypto" value="" class="investment">
            <button class="button button--primary check" >Check</button>
        </div>
    </header>
</div>
</body>
</html>
We are going to complete the html code above by adding the main section of our application to it and it will now look like the code below:
<!DOCTYPE html>
<html>
<head>
    <title>Crypto gain and loss leaderboard</title>
    <meta name="viewport" content="width=device-width, initial-scale=1.0" />
    <link rel="stylesheet" href="style.css">
</head>
<body>

<div class="container">
    <header class="header">
        <img src="https://s3-us-west-2.amazonaws.com/s.cdpn.io/813538/km-logo-color.svg" class="logo">
        <div class="input-box">
            <select name="" class="select" id="select-crypto">

            </select>
            <input type="text" placeholder="quantity" value="" class="quantity">
            <input type="text" placeholder="Cost per crypto" value="" class="investment">
            <button class="button button--primary check" >Check</button>
        </div>
    </header>

    <main class="row">
        <div class="card">
            <div class="card__body">
                <ul class="list" id="list">
                    <li class="list__item text--title" id="list__item--title">
                        <div class="list__grid">
                            <div class="text--left text--small text--dark">Crypto</div>
                            <div class="text--right text--small text--dark"> Investment, gain & loss</div>
                        </div>
                    </li>
                </ul>
                <button class="button button--primary check">Check for update</button>
                <button class="button button--primary check">Clear all</button>
            </div>
        </div>
    </main>
</div>
</body>
</html>
After checking the code closely, you might be wondering “what is the meaning of list, listitem, listitem--ti and text--dark?”. Well, that is one of the naming conventions used in html and css, and it is called Block Element and Modifier ( BEM ).
What is BEM?
Bem stands for Block, Element and Modifier. It is used to write readable CSS classes. Let’s examine what Block, Element and Modifier stand for:
Block: It is a self-contained or independent reusable component of a webpage. A block class can be a layout, section or component and named as “header, list, keettu-header, etc”
<div class="list">...</div>
<button class="button"></div>
<div class="logo">...</div>
The elements above represent reusable blocks of code.
Element: Element refers to the child of each block. A block element class is named as “listitem, blockelement”.
<main>
    <div class="list">
        <div class="list__item">...</div>
    </div>
</main>
Modifier: Modifier is anything that changes the current state or initial properties ( color, size, width) of a block or an element. A modifier class is always named as in “text--teal, text--dark, text--success, text--primary, list__item--success, list--success, etc”.
Applying styles using CSS/SCSS
What is SCSS?
It is an extension language that adds more functionalities to writing CSS. It was formally called Syntactically Awesome Style Sheets (SASS) before it was renamed to Sassy Cascading Style Sheets (SCSS). SCSS is designed to achieve modularity and reusability. In short, we are about to add style sheets to the application.
The first thing we have to do is add both CSS and SCSS variables and variable functions we’re going to be using...
html {
    --black: #000;
    --white: #fff;
    --dark: #A4AFBF;
    --light: #DAD4F1;
    --lighter: var(--white);

    --primary: #7B16FF;
    --primary-light: #DDD9FF;
    --primary-trans: rgba(123,22,255,0.4);

    --orange: #E17055;
    --green: #14c04d;

    --bg: var(--white);
    --color: var(--lighter);
}

$directions: (
    l: left,
    r: right,
    b: bottom,
    t: top
);

$flex-directions: (center,flex-end,flex-start,space-between);

$states: (
    dark: var(--dark),
    light: var(--lighter),
    orange: var(--orange),
    primary: var(--primary),
    success: var(--green),
    transparent: transparent,
);

$spacing-unit: 0.9rem;

$spacers: (
    2: $spacing-unit/4,
    4: $spacing-unit/2,
    8: $spacing-unit,
    16: $spacing-unit*2,
    24: $spacing-unit*3,
    32: $spacing-unit*4
);
Now, let’s style generic HTML tags so that they can behave the way we want.
*,*:before,*:after {
    padding: 0;
    margin: 0;
    box-sizing: border-box;
}

html {
    font-size: 62.5%;
}

html,body {
    width: 100%;
    height: 100%;
}

body {
    background: var(--bg);
    color: var(--color);
    font-size: 1.6rem;
    font-family: 'Overpass Mono', system-ui;
}

h1,h2,h3,h4,h5,h6 {
    font-weight: 400;
    text-transform: uppercase;
    letter-spacing: 0.05em;
    margin-top: $spacing-unit;
    margin-bottom: $spacing-unit;
    font-family: 'Oswald', system-ui;
}

a {
    color: var(--primary);
    text-decoration: none;
    transition: all 110ms ease-out 0s;
    display: inline-block;
    border-radius: $spacing-unit/2;
    &:hover {
        background: var(--primary-trans);
        color: var(--primary-light);
        box-shadow: 0px 0px 0px $spacing-unit/2 var(--primary-trans);
    }
}

button, textarea, input, select {
    font-family: inherit;
    color: inherit;
    &:active, &:focus {
        outline: 0;
    }
}

button,select {
    cursor: pointer;
}
Also, there are some repetitive styles we want to do but instead of adding them repeatedly, we use SCSS to automate them. For example, we may create some reusable classes such as mt--2, mt--4 and it such will be repetitive so we are using SCSS to achieve it as in the below code:
@each $key,$val in $states {
    .button--#{$key} {
        background: $val;
    }
}

.text--title {
    font-family: 'Oswald', system-ui;
}

.text {
    &--left {
        text-align: left;
    }
    &--center {
        text-align: center;
    }
    &--right {
        text-align: right;
    }
}

@each $key,$val in $states {
    .bg--#{$key} {
        background: $val !important;
    }
    .text--#{$key} {
        color: $val !important;
    }
}

.display--flex {
    display: flex;
}


@each $direction in $flex-directions {
    .align--#{$direction} {
        align-items: $direction;
    }
    .justify--#{$direction} {
        justify-content: $direction;
    }
}

.text--small {
    font-size: 1.4rem;
}

@each $key,$val in $spacers {
    @each $abbr,$direction in $directions {
        .p#{$abbr}--#{$key} {
            padding-#{$direction}: $val;
        }
        .m#{$abbr}--#{$key} {
            margin-#{$direction}: $val;
        }
    }
}
Then, below is the main style for the application:
.container {
    width: 100%;
    max-width: 960px;
    margin: auto;
    padding: $spacing-unit*2 $spacing-unit*2 $spacing-unit*4;
}

.row {
    display: grid;
    grid-template-columns: 3fr;
    grid-column-gap: $spacing-unit*2;
    grid-row-gap: $spacing-unit*2;
    position: relative;
    @media screen and(max-width: 700px) {
        grid-template-columns: 1fr;
    }
}

.header {
    padding: $spacing-unit*2 0;
    display: flex;
    justify-content: space-between;
    align-items: center;
    margin-bottom: 2.2rem;
    position: relative;
    &:before {
        content: '';
        position: absolute;
        bottom: 0;
        right: 0;
        left: 0;
        height: $spacing-unit/4;
        background: var(--primary-trans);
    }
}

.card {
    border-radius: $spacing-unit;
    background: var(--white);
    width: 100%;
    margin-bottom: $spacing-unit*2;
    box-shadow: rgba(0, 0, 0, 0.05) 0px 0px 0px $spacing-unit/8;
    &__body, &__header {
        padding: $spacing-unit*3;
        @media screen and(max-width: 700px) {
            padding: $spacing-unit;
        }
    }
    &__header {
        display: flex;
        align-items: center;
        justify-content: space-between;
        padding-bottom: 0;
        @media screen and(max-width: 700px) {
            flex-direction: column;
        }
    }
}

.logo {
    display: inline-block;
    width: 100%;
    max-width: $spacing-unit*16;
    user-select: none;
}

.list {
    margin: 0;
    padding: 0;
    list-style-type: none;
    &__item {
        padding: $spacing-unit*3;
        box-shadow: rgba(0, 0, 0, 0.05) 0px 1px 2px 0px;
    }
    &__grid {
        display: grid;
        grid-template-columns: $spacing-unit*8 3fr;
        grid-column-gap: $spacing-unit*3;
        @media screen and (max-width: 700px) {
            grid-template-columns: $spacing-unit*8 1fr;
            grid-column-gap: $spacing-unit*8;
        }
    }
}

.media {
    display: inline-flex;
    align-items: center;
    &__content {
        padding-left: $spacing-unit;
        color: var(--dark);
    }
    &__title {
        margin-bottom: $spacing-unit/2;
        @media screen and(max-width: 700px) {
            font-size: 1.4rem;
        }
    }
}
.avatar {
    $size: $spacing-unit*6;
    display: inline-flex;
    align-items: center;
    justify-content: center;
    width: $size;
    height: $size;
    border-radius: 50%;
    background: var(--lighter);
    color: var(--dark);
    margin-right: $spacing-unit*2;
    @media screen and (max-width: 700px) {
        $size: $spacing-unit*4;
        width: $size;
        height: $size;
        margin-right: 0;
    }
    &--lg {
        $size: $spacing-unit*10;
        width: $size;
        height: $size;
    }
}

.button {
    display: inline-block;
    background: var(--dark);
    border: 0;
    border-radius: $spacing-unit/2;
    padding: $spacing-unit*1.5 $spacing-unit*2.5;
    transition: all 100ms ease-out 0s;
    &--block {
        display: block;
        width: 100%;
    }
    &:hover, &:focus {
        filter: brightness(0.9);
    }
    &:focus {
        box-shadow: 0px 0px 0px $spacing-unit/2 var(--primary-trans);
    }
    &:active {
        box-shadow: 0px 0px 0px $spacing-unit/2 var(--primary-trans), inset 0px 0px $spacing-unit rgba(black, 0.2);
        filter: brightness(0.8);
    }
}

.select, .price, .quantity {
    background: transparent;
    color: #444;
    border: 1px solid #f1d3f1;
    padding: $spacing-unit*1.5;
    appearance: none;
    font-size: $spacing-unit*1.5;
    transition: all 120ms ease-out 0s;
    &:hover {
        background: var(--darkest);
    }
}
We have designed the look of the application with HTML and CSS/CSS. But wait, how are you going to convert the SCSS to CSS? There are several ways to do that but I am going to use Koala in this article. Koala is a downloadable application. You can download it here.
Below is what it looks like after installing it:
To use it, you to click the plus icon to navigate to the folder that contains your scss file. It will detect all the SCSS and CSS files in the folder itself. You just click on the file you want to compile to CSS and click compile by the right button of the application. That is how to compile it to CSS.
Here is a link to an already compiled CSS file for this application.
Applying application behaviour with JavaScript
It is time to apply JavaScript in our application to make it fully functional. The first thing we have to do is add a script tag before the closing tag of the body ().
<!Doctype>
<html>
//...other code here
<script src="script.js"></script>
</body>
</html>
The first thing we want to do is store “histories” of operation carried out in the localStorage and set it default value to an empty array [ ]:
const histories = localStorage.getItem('histories') ? JSON.parse(localStorage.getItem('histories')) : [];
localStorage.setItem('histories', JSON.stringify(histories))
We need to first check out CoinGecko API we’re going to be using. You can check out their documentation here.
Then, we create a function that will get and return cryptocurrencies from coingecko.com’s API:
const getCryptos = async () => {
    const API_URL = `https://api.coingecko.com/api/v3/coins`;
    console.log(API_URL)
    const response = await fetch(API_URL);
    if (!response.ok) {
        throw new Error (`An error occurred: ${response.status}`);
    }
    return response.json();
};
We need to provide options to select cryptocurrency of choice, so we need a function that will getCrypto function and the use returned cryptocurrencies to options for the application. The function below does just that:
const makeSelectOptions = (cryptocurrencies) => {
    const options = cryptocurrencies.map(( cryptocurrency, index) => {
        return `<option value="${index}">${cryptocurrency.name}</option>`;
    });

    const selectCrypto = document.querySelector('#select-crypto');
    const optionsWithTitle = `<option selected>Choose Crypto currency</option>${options.join('')}`;
    selectCrypto.innerHTML = optionsWithTitle;
}
It is used to create the options you can see in the image below:
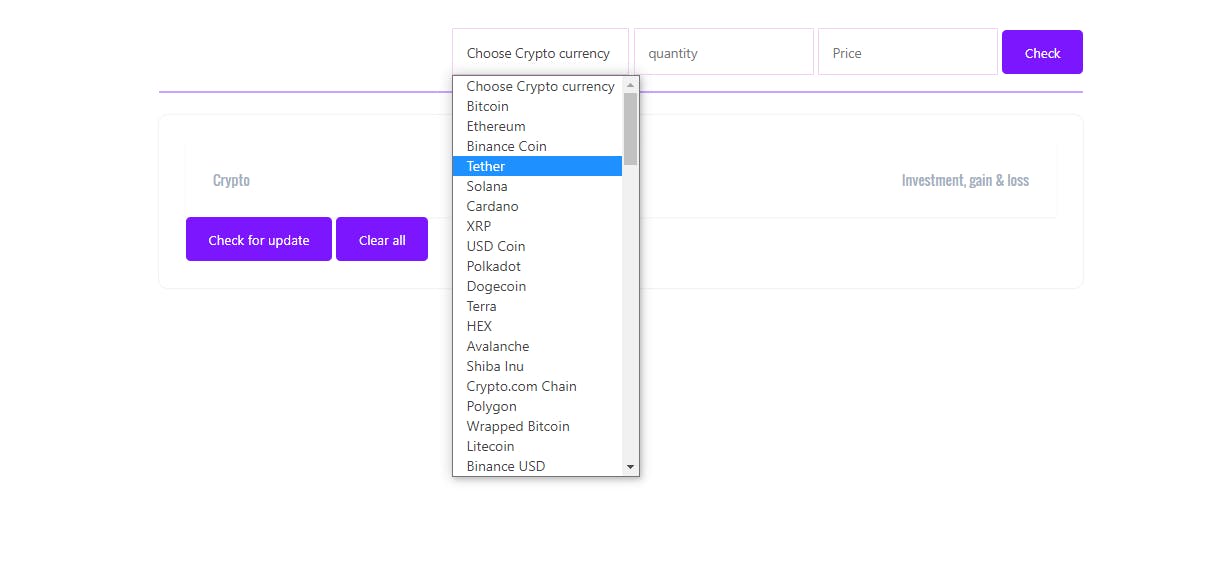
To calculate returns (gain or loss) on crypto investment, we need a function handle the calculation and the function below does the calculation:
const calculateReturns = (currentPrice, cost, quantity) => {
    const returns = ((currentPrice * quantity) - (cost * quantity)).toFixed(2);
    const totalCost = cost * quantity;
    const total = (Number(totalCost) + Number(returns)).toFixed(2);  //the current total,that is, total cost + profits
    return {
        returns,
        totalCost,
        total
    }
}
Before we calculate returns, users need to select crypto, input quantity of crypto bought and price per crypto bought, so the question now is how do we achieve that? Yeah! That is a nice question. We are getting there. Let’s add some functions now:
const check = (cryptocurrencies, history = {}) => {

    const check = document.querySelector('.check');
    check.addEventListener('click', (event) => {
        event.preventDefault();
        display(cryptocurrencies, history)
    })
}

const display = (cryptocurrencies, history) => {
    const data = resolveData(cryptocurrencies, history);
    const view = makeView(data);

    const row = document.createElement('li')
    const list = document.querySelector('.list')
    row.innerHTML = view;
    insertAfter(row, list.childNodes[0].nextSibling)
}
Whenever the check() function is called, it will check whether the check button of the application is clicked and if it is clicked; then, it will call display() function. display() function also will call another three functions named resolveData(), makeView() and insertAfter().
resolveData() determines what to display between a current operation or a former operation (history) and makeView() uses the data from resolveData to make a view to be displayed. We create an li tag and set it innerHTML to the view created with makeView() and then uses insertAfter() to put after the first child of ul tag that has a “list” has its class name.
Oh wait, we have not created resloveData(), makeView() and insertAfter(). Okay...let’s create them right away.
const resolveData = (cryptocurrencies, history = {}) => {
    const selectedCryptoEl = document.querySelector('#select-crypto');
    const index = history.index ?? selectedCryptoEl.value;
    const cryptocurrency = cryptocurrencies[index]

    const price = cryptocurrency.market_data.current_price.usd;

    const costInput = document.querySelector('.price');
    const cost = history.cost ?? costInput.value;

    const quantityInput = document.querySelector('.quantity');
    const quantity = history.quantity ?? quantityInput.value;
    const estimate = calculateReturns(price, cost, quantity);

    if(Object.entries(history).length === 0){
        store({index, quantity, cost})
    }

    costInput.value = "";
    quantityInput.value = "";

    return {
        cryptocurrency,
        estimate,
        index
    }
}
const makeView = (data) => `
        <li class="list__item">
            <div class="list__grid">
                <div class="media">
                    <img class="avatar media__img" src="${data.cryptocurrency.image.thumb}" />
                    <div class="media__content">
                        <div class="media__title">${data.cryptocurrency.symbol}</div>
                        <h5>${data.cryptocurrency.name}</h5>
                    </div>
                </div>
                <div class="text--right">
                    <div class="mt--8">
                        <span class="text--dark">invested :</span>  <strong class="text--primary">$${data.estimate.totalCost}</strong>
                    </div>
                    <div class="mt--8 ${isGain(data.estimate.returns) ? 'text--success' : 'text--orange'}">
                    ${isGain(data.estimate.returns) ? 'gain' : 'loss'} :  <strong>$${Math.abs(data.estimate.returns)}</strong>
                    </div>
                    <div class="mt--8 text--dark">
                      Total: <strong>$${Math.abs(data.estimate.total)}</strong>
                    </div>
                </div>
            </div>
        </li>
        `;
const insertAfter = (newNode, existingNode) => existingNode.parentNode.insertBefore(newNode, existingNode.nextSibling);
After adding all the functions called by the display() function, and after reading the functions, you should notice that resolveData also call another function called store() to keep a record of every gain and loss on crypto investment in the localStorage so that users won’t need to input them in the future.
They only need to click on check for update button to get latest information. In short, we have to create store() function as in below:
const store = (history) => {
    histories.push(history);
    localStorage.setItem('histories', JSON.stringify(histories));
}
At the same time, makeView() method also calls another function called isGain to calculate whether returns is a gain or not. If it is not a gain, the application concludes it is a loss. The function below does just that:
const isGain = (returns) => {
    return Math.sign(returns) == 1 ? true : false;
}
Yeah, we have added all necessary functions but something is missing. If you pay keen attention, you would realize that we have not initialized the application because the functions we added have not been called. We have only called functions within other functions which have not been called. So the application won’t be working until we add the code below:
const init = async () => {
    const cryptocurrencies = await getCryptos();
    makeSelectOptions(cryptocurrencies);

    histories.forEach( history => display(cryptocurrencies, history));
    check(cryptocurrencies);
}

init();
Hurraaaaaay! The application should be working now.
Conclusion
We have just built an application that helps us calculate our returns, gains or losses, on crypto investments. It is built with nomics’ API, HTML, CSS/SCSS, JavaScript and a lot of thinking and googling. Now, I want you to go and build an application that makes use of whatever you have learned from this tutorial. Bye for now.