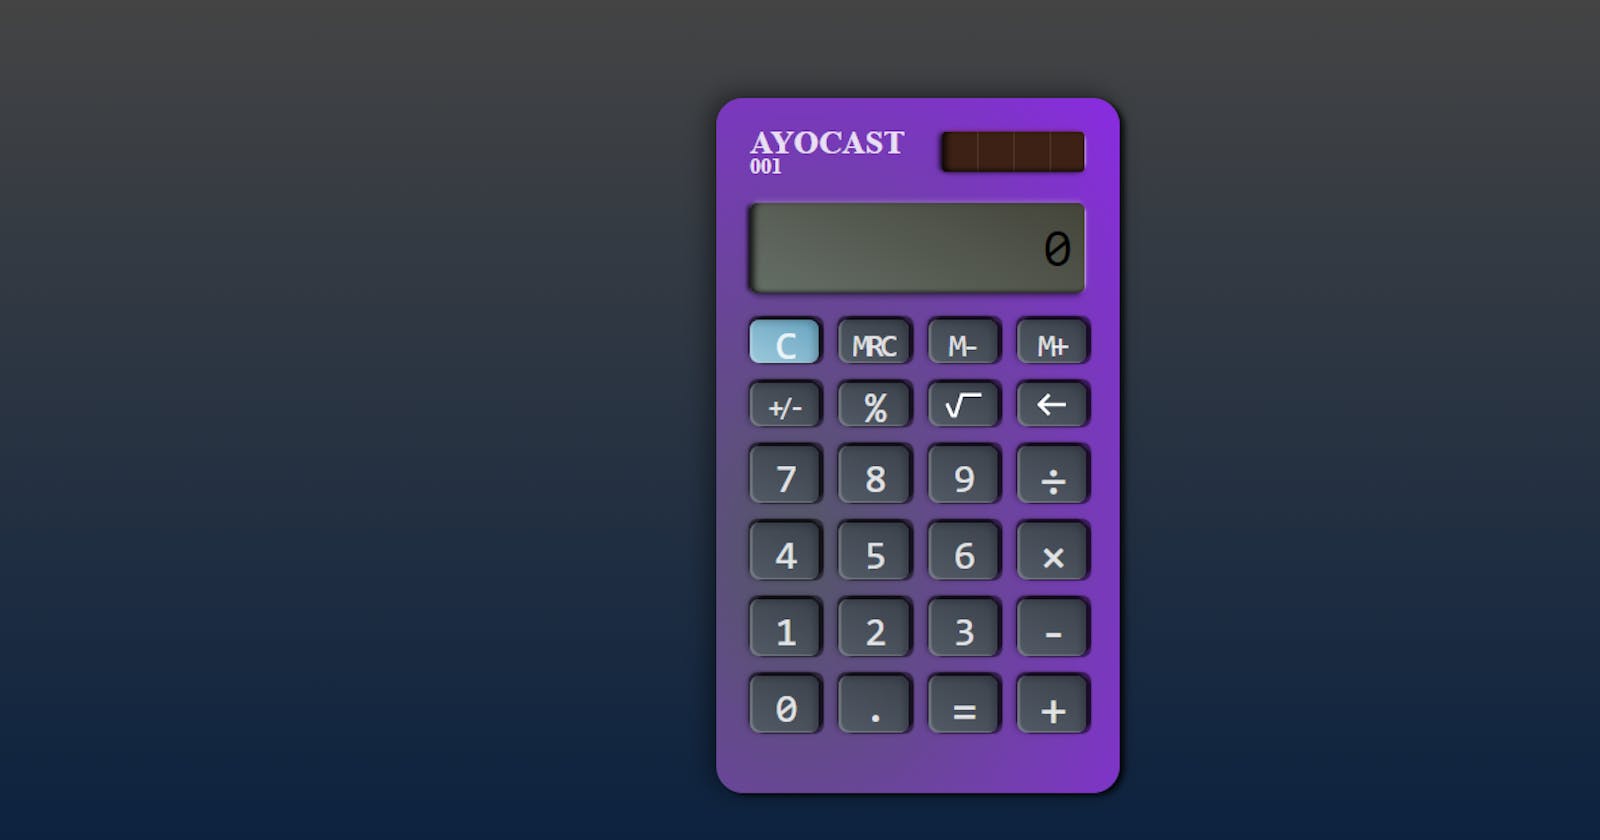
Welcome to this lesson, in this lesson, we are going to continue to build the calculator we started previously. We will focus on adding buttons to the keyboard of the calculator in this lesson.
If there is anything you don't understand in this tutorial, that means you probably need to read How to build a calculator with HTML and CSS( part 3)
Step 1: Adding memory buttons to the keyboard
<!--<div class="keyboard"> -->
    <!-- Begin memory buttons -->
    <button type="button" data-type="clear" class="button reset"
          value="C">C</button>
    <button type="button" data-type="memory" class="button memory"
          value="MRC">MRC</button>
    <button type="button" data-type="memory" class="button memory"
          value="MMINUS">M-</button>
     <button type="button" data-type="memory" class="button memory"
          value="MPLUS">M+</button>
     <!-- End memory buttons -->
<!-- </div> -->
We add the buttons that control the calculator memory to the keyboard section. If you pay close attention to the button, you would realize they are more or less the same. data-type is a custom attribute and we use it to register the type of the value of each of the buttons. It would be accessed with JavaScript.
Step 2: Adding function buttons to the keyboard
 <!-- End memory buttons -->
 <!-- Begin function buttons -->
        <button type="button" data-type="function"
          class="button function" value="negate">+/-</button>
        <button type="button" data-type="function"
          class="button function" value="findPercentage">%</button>
        <button type="button" data-type="function"
          class="button function p-0" value="square">
          <svg class="square-symbol" viewBox="0 0 33 23" fill="none"
            xmlns="http://www.w3.org/2000/svg">
            <path d="M2 10l5 11h2.5l6-19H33" stroke="#fff" stroke-width="3" />
            </svg>
        </button>
        <button type="button" data-type="function"
          class="button operator p-0" value="backspace">
          <svg class="backspace" viewBox="0 0 27 22" fill="none"
            xmlns="http://www.w3.org/2000/svg">
            <path d="M12 2l-9 9 9 9M3 11h24" stroke="#fff" stroke-width="3" />
            </svg>
        </button>
        <!-- End function buttons -->
These buttons are meant to be added to the keyboard section of the calculator immediately after the memory buttons.
Step 3: Adding number and operation buttons to the keyboard
 <!-- End function buttons -->
<!-- Begin number/operator buttons -->
        <button type="button" data-type="number" class="button"
          value="7">7</button>
        <button type="button" data-type="number" class="button"
          value="8">8</button>
        <button type="button" data-type="number" class="button"
          value="9">9</button>
        <button type="button" data-type="operator"
          class="button operator" value="divide">÷</button>
        <button type="button" data-type="number" class="button"
          value="4">4</button>
        <button type="button" data-type="number" class="button"
          value="5">5</button>
        <button type="button" data-type="number" class="button"
          value="6">6</button>
        <button type="button" data-type="operator"
          class="button operator" value="multiply">×</button>
        <button type="button" data-type="number" class="button"
          value="1">1</button>
        <button type="button" data-type="number" class="button"
          value="2">2</button>
        <button type="button" data-type="number" class="button"
          value="3">3</button>
        <button type="button" data-type="operator"
          class="button operator" value="subtract">-</button>
        <button type="button" data-type="number" class="button"
          value="0">0</button>
        <button type="button" data-type="number" class="button"
          value=".">.</button>
        <button type="button" data-type="function"
          class="button operator" value="equals">=</button>
        <button type="button" data-type="operator"
          class="button operator" value="add">+</button>
         <!-- End number/operator buttons -->
After adding the buttons, then let's style them to look exactly like what we want. So it is time to add some CSS.
Step 4: Using a grid to create a layout for the keyboard
.keyboard {
    display: grid;
    grid-template-columns: repeat(4, 1fr);
    grid-template-rows: repeat(2, 30px) repeat(4, 40px);
    gap: 15px;
 }
We set display to grid to tell the browser we're using the grid layout system. Then we set grid-template-columns to repeat(4, 1fr). The 4 in the repeat() means we divide the keyboard into 4 columns. The 1fr unit means the width of each of the columns is 1/4 of the keyboard width. That means, all the columns will have the same width which can be added up to the total width of the keyboard.
That is why the buttons are divided into 4 columns and have equal width. We set the grid-template-rows to repeat(2, 32px) repeat(4, 40px). Notice that there is a space between repeat(2, 32px) and repeat(4, 40px). What does that mean? repeat(2, 32px) means we select the first two rows and set their height to 32px, and repeat(4, 42px) means we select the next four rows and set their height to 42px.
Then we set gap to 15px. That means the gaps on all sides (top, left, right and button) of each of buttons of the keyboard to 15px.
Step 5: Styling the button
 .button {
    font-family: inherit;
    font-size: 30px;
    border-radius: 7px;
    border: 0;
    padding: 0;
    display: flex;
    justify-content: center;
    align-items: center;
    padding-top: 5px;
    letter-spacing: -3px;
    outline: none;
    background: linear-gradient(25deg, #525a65, #3b424c);
    color: rgba(255, 255, 255, .8);
    text-shadow: 0 0 2px rgba(255, 255, 255, .2);
    box-shadow: inset 2px -1px 1px 0 rgba(255, 255, 255, .2),
      inset -3px 2px 5px 0 rgba(0, 0, 0, .2),
      4px 1px 1px 0 rgba(0, 0, 0, .5),
      -1px -3px 1px 0 rgba(0, 0, 0, .5),
      4px -3px 1px 0 rgba(0, 0, 0, .5),
      -1px -1px 5px 0 rgba(0, 0, 0, .5);
  }
If you have been following this tutorial from the beginning, you should understand how to use linear-gradient, text-shadow and box-shadow above; if you don't understand, check out How to build a calculator with HTML and CSS( part 3) and other tutorials.
The buttons have outline and border but we set them to none to hide the outlines and borders. We hide the outline and border of the buttons for the box-shadow to be more effective. And we finally set letter-spacing to -3px to reduce the space between two letters on some of the buttons.
Step 6: Additional styles
 .button[value="negate"] {
    font-size: 20px;
  }

  .p-0 {
    padding: 0;
  }
We select any element that has a button as its class name and "negate" as its value. Then we set its font-size to 20px. We use p-0 to create a class name that adds zero padding to an element
  .square-symbol {
    width: 31px;
    height: 19px;
  }

  .operator {
    font-size: 36px;
  }
.square-symbol is selected and we set its width to 31px and its height to 19px. .operator points to operator buttons and we set their font-size to 36px.
  .memory {
    font-size: 24px;
  }

  .reset {
    background: linear-gradient(25deg, #9cc9dc, #68a4c0);
  }

  .backspace {
    width: 24px;
    height: 18px;
  }
.memory is used to select buttons that handle memory operations and set their font-size to 24px. .reset selects the clear buttons and we set its background color to linear-gradient with 25 degrees and blends #9cc9dc and #68a4c0.
We finally select .backspace and set its width to 24px and height to 18px. And yeah! We have built the calculator. See you in another tutorial.
